Quantcast
Channel: ConfigMgr, Tips and Tricks
Viewing all 60 articles
Browse latest View live

Deploying 3ds Max 2009 using SCCM 2007 R2

$
0
0
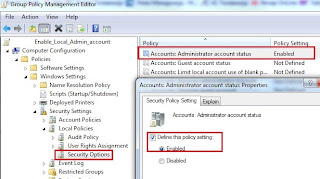
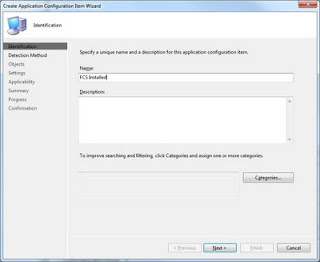
Creating of Customized Network deployment of 3ds Max is described on AutoDesk web site:

http://usa.autodesk.com/adsk/servlet/ps/dl/item?siteID=123112&id=14195309&linkID=9241177

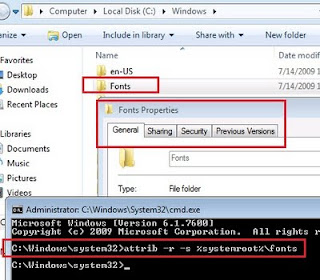
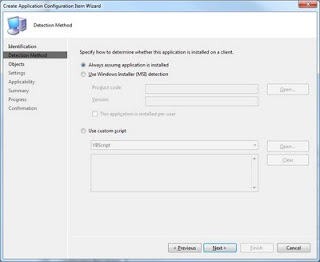
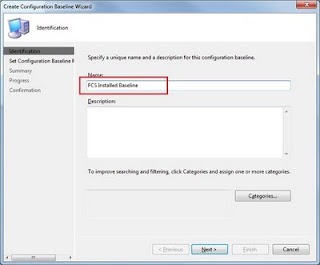
When the creation of Network Deployment is done a shortcut 3dsmax_2009.ini is created.


Click on it will allow 3ds Max to be installed in silent mode (if silent mode is specified during network deployment creation).

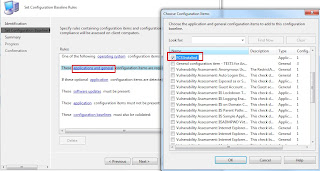
This shortcut points to the subfolder AdminImage which call setup.exe, use switch /I and 3Dsmax_2009.ini file created by Network deployment procedure.

setup.exe /I 3Dsmax_2009.ini
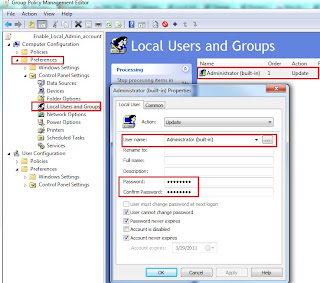
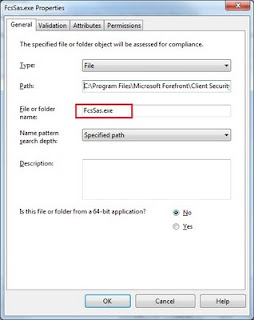
Note:
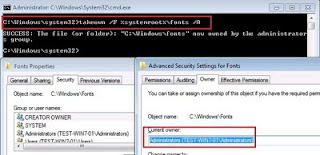
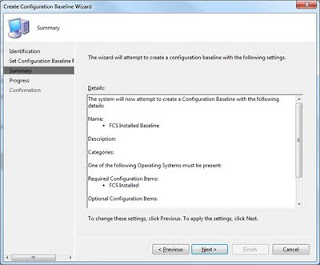
setup.exe and 3dsmax_2009.ini contains network UNC path where they are physically located.

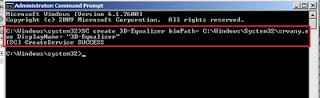
\\server\share\3dsmax_2009\AdminImage\setup.exe /I \\server\share\3dsmax_2009\AdminImage\3dsmax_2009.ini

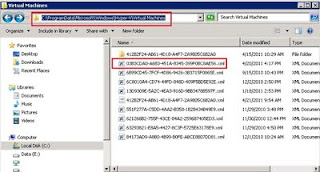
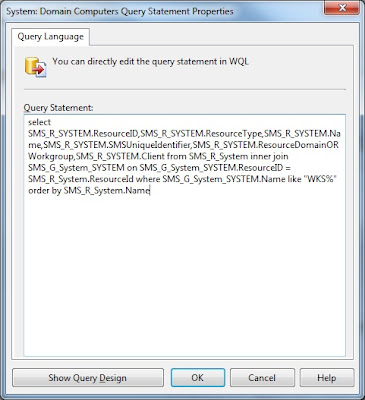
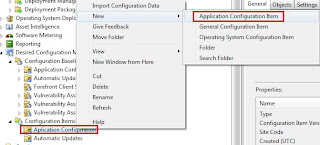
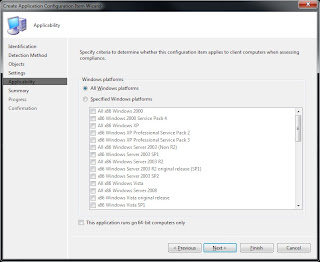
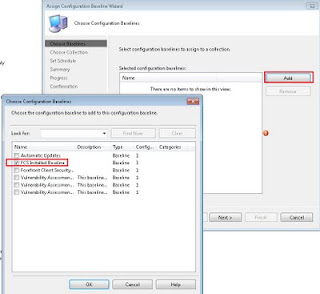
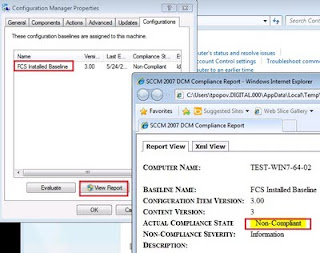
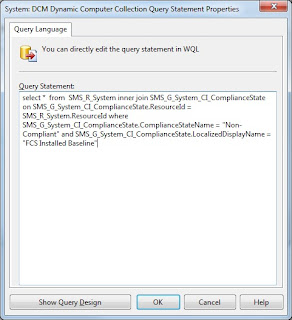
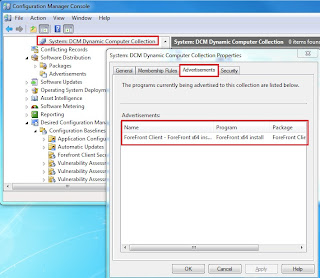
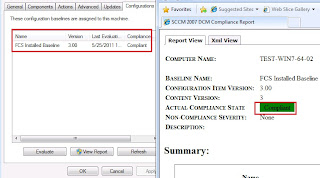
Using this syntax  SCCM package can be created and 3ds Max 2009 will be successfully deployed:


FLEXlm license finder issue

$
0
0
During customization of 3ds Max 2009 Software Package for Network deployment described on AutoDesk web site (http://usa.autodesk.com/adsk/servlet/ps/dl/item?siteID=123112&id=14195309&linkID=9241177), Network License Server has been configured:


But after the installation when 3ds Max has been started, from some reason the value for Network License Server previously configured in Network deployment package is not accepted, FLEXlm license finder pop-up and ask for License File or License Server.


Solution for this can be adding System Environment variable ADSKFLEX_LICENSE_FILE with the value of @SERVERNAME and deploying on the workstations using GPO Preferences.

@SERVERNAME - is the name of your Network License server

Enable WINDOWS 7 Administrator Account with Group Policy (GPO)

$
0
0
Administrator account is disabled by default on Windows 7.
Group Policy can be used to enable it.
Create a new GPO and go to: Computer configuration -> Policies -> Windows Settings -> Security Settings -> Security Options. On Right Pane click on Accounts: Administrator account status and change the settings to Enabled.


To enter a password for the Local Administrator Account, Group Policy Preferences can be used:

Go to Preferences -> Control Panel Settings -> and right click on Local Users and Groups. Choose: New -> Local User. From Drop-down menu on User name choose: Administrator (built-in).
Put the password and confirm it.


Hyper-V: The operation cannot be performed while the object is in its current state.

$
0
0
This message appears when you try to delete Virtual Machine from Hyper-V Manager:

The operation cannot be performed while the object is in its current state.

If you go manually to delete the folder where is VM located you will get an error message that you don't have permissions to do that.Into this folder there is config XML file:


Solution for this issue is to find the same XML file in :

C:\ProgramData\Microsoft\Windows\Hyper-V\Virtual Machines

and to delete it.
Note: First you should enable: Show hidden files, folders and drives in Folder Option. 


After that when you open Hyper-V Manager you will see that the machine is gone.

Hyper-V: An error occurred while attempting to export the virtual machine.

$
0
0
When you try to export Hyper-V Virtual machine to network share you get this error:

An error occurred while attempting to export the virtual machine. 
Failed to copy file during export.
General access denied error (0x80070005)


Solution:
Computer account of Hyper-V host should have permissions on NTFS and share level to write to target network share:

NTFS permissions:

1.  On the destination server, Right-click on the shared folder and select Properties. 
2.  Select the Security tab. 
3.  Click Edit button and click the Add button in the permissions dialog box. 
4.  Click Oject Types and select Computers if not already done and click OK.
5.  In the dialog "Enter the object names to select" provide the name of Hyper-V host machine and click Check Names.
6.  With the Hyper-V host machine name select, click Allow by "Full control" and click OK.

Share  permissions:

1.  On the destination server, Right-click on the shared folder and select Properties. 
2.  Select the Sharing tab. 
3.  Click Advanced Sharing...
4.  On the Advanced Sharing dialog, click Permissions  and then Add.
5. Click Oject Types and select Computers if not already done and click OK.
6.  In the dialog "Enter the object names to select" provide the name of Hyper-V host machine and click Check Names.7.  With the Hyper-V host machine name select, click Allow by "Full control" and click OK.

Allowing Non-Admin Users To Install Fonts in Windows 7

$
0
0
Installing Fonts for Standard Users in Windows XP was very easy. Modifying NTFS folder permissions and giving users modify permissions allow they to copy fonts into C:\Windows\Fonts and after that use them.

Installing Fonts in Windows 7 for standard user is different story and it could be very complicated.

Modifying NTFS Permissions on C:\Windows\Fonts  is not possible because Fonts is a System folder and right click on Fonts folder doesn't give possibility for direct NTFS permissions changes.


To change System folder properties attrib command can be used:

attrib -r -s %systemroot%\fonts

-r  - clears Read-only file attribute
-s  - clears System File attribute


Next step is take ownership of Fonts Folder and all files into this folder.

Example: To give Administrators group Ownership to Fonts folder takeown command can be used:

takeown /F %systemroot%\fonts\ /A

/F - Specifies the filename or directory name pattern. Wildcard * can be used to specify the pattern.
/A - Gives ownership to the administrators group instead of current user


Next Step is to change NTFS permissions on Fonts Folder and give Modify or Full permissions to users or groups. To do that you should use cacls command: 

Example:

cacls %systemroot%\fonts /E /G Users:F

/E - Edit ACL instead of replacing it.
/G - Grant specific user rights (in this example it gives Full permissions to Users group)
Note: This command changes Fonts Folder permissions and doesn't inherit permissions to the files into the folder.

You can copy all these three lines in Notepad and save it as bat file.

attrib -r -s %systemroot%\fonts
takeown /F %systemroot%\fonts\ /A
cacls %systemroot%\fonts /E /G Users:F

Next Step is to modify permissions on
HKEY_LOCAL_MACHINE\SOFTWARE\Microsoft\Windows NT\CurrentVersion\Fonts
and to give Full Permissions to Users. This will allow standard users to register fonts in registry.


Next step is to copy your fonts in C:\WINDOWS\FONTS Folder. Here is the vbs script which can copy and in same time register your fonts. Fonts are located on network share and before to execute you should modify the script with fonts names.

' ****************************************************************************
' Copy Fonts From Network Share To C:\WINDOWS\FONTS Folder Of Workstation
' ****************************************************************************
Set WshShell = CreateObject("WScript.Shell")
WshShell.Run "xcopy.exe ""\\%SERVERNAME%\%SHARE \FONTS"" ""C:\windows\fonts"" /C /I /S /E /H /Y /Q", 1,True

' ****************************************************************************
' Imports The Registry Information For The New Fonts - Add A New Line For Each New Font
' Example : WshShell. RegWrite"HKEY_LOCAL_MACHINE\SOFTWARE\Microsoft\Windows NT\CurrentVersion\Fonts\%FONT REG KEY%", "%FONT REG KEY ENTRY%", "REG_SZ"
' ****************************************************************************

Set WshShell = WScript.CreateObject("WScript.Shell")
WshShell. RegWrite"HKEY_LOCAL_MACHINE\SOFTWARE\Microsoft\Windows NT\CurrentVersion\Fonts\Twiggy-Bold (TrueType)", "Twiggy-Bold.ttf", "REG_SZ"
WshShell. RegWrite"HKEY_LOCAL_MACHINE\SOFTWARE\Microsoft\Windows NT\CurrentVersion\Fonts\Twiggy-Light (TrueType)", "Twiggy-Light.ttf", "REG_SZ"
' ****************************************************************************

SCCM 2007 R2 - Create Dynamic collections based on string in computer name

$
0
0
Here is the query which you can use for creating Dynamic Computer Collection based on string inside the computer name.

Example: If your computers contain WKS string in computer name:

select SMS_R_SYSTEM.ResourceID,SMS_R_SYSTEM.ResourceType,SMS_R_SYSTEM.Name,SMS_R_SYSTEM.SMSUniqueIdentifier,SMS_R_SYSTEM.ResourceDomainORWorkgroup,SMS_R_SYSTEM.Client from SMS_R_System inner join SMS_G_System_SYSTEM on SMS_G_System_SYSTEM.ResourceID = SMS_R_System.ResourceId where SMS_G_System_SYSTEM.Name like "%WKS%" order by SMS_R_System.Name

Desired Configuration Management: Software Distribution to Dynamic Computer Collection based on Compliant Status - Part 1

$
0
0
Implementing Desired Configuration Management (DCM) in SCCM 2007 R2, which is by default not enabled, can be very useful.
Checking if some software is installed or not, getting the compliant or not-compliant status, creating Dynamic Computer Collections based on this status and applying Software package can be ideal solution for your environment.
But let's start.
In this example I will check if FCS ForeFront client is installed or not.
First lets create Configuration Item:


In Path field write the path where FCS is installed by default C:\Program Files\Microsoft Forefront\Client Security\Client\SSA and put the FcsSas.exe in File or folder name field:


Click Next and Close.

Next Step is to create Configuration Baseline where the previous FCS Installed created Configuration Item will be included.


Write the name of Configuration baseline. In this case it is FCS Installed Baseline.


Choose Application and General and right from the list choose FCS Installed.

Click Next and after that Close. 

Next step is to assign this Configuration Baseline to Computer Collection  but to avoid applying the Configuration Baseline on All System computer collection you can create a Dynamic Computer Collection. I've published an article where I created a dynamic collection based on string included in computer name:


Desired Configuration Management: Software Distribution to Dynamic Computer Collection based on Compliant Status - Part 2

$
0
0
This article continues from Part 1 http://tompopov.blogspot.com/2011/05/desired-configuration-management.html

To apply Configuration Baseline to Computer Collection right click on target collection and click on Assign Configuration Baseline:


Choose the Configuration Baseline, in this case FCS Installed Baseline, click OK, Next and Close.

When the Configuration Baseline is applied to the target computer, go on SCCM Configuration Manager client, click on Evaluation of selected FCS InstalledBaseline configuration baseline and clicking on View Report you will get that the status is Non-Compliant:


Next step is to create Dynamic Computer collection based on the status of the DCM.

Right click on Collections and choose New Collection. Write the name, in this case is: System: DCM Dynamic Computer Collection


Click on query button, write the name of the query (in this case FCS Compliant Status), click on Radio buton Limit to collection to choose the collection (System: DCS tests was the Computer Collection where DCM Configuration baseline was applied) and click on Edit Query Statement. 


Click on Criteria tab, click on yellow star, choose Select on Criteria properties window, in Select Atribute window on Attribute class choose Configuration Item Compliance state and on Attribute choose Compliance State Name.


Click on Value button and choose Non-Compliant in Values window.


Click Ok to close Criterion Properties window and to save the criateria.


Click on the yellow start to create another criteria. Click Select on Criterion properties window, in Select Attribute window on Attribute class choose Configuration Item Compliance state and on Attribute choose Localized Display Name. Click OK to close Select Attribute window.


Choose FCS Installed Baseline from the list and click OK to close Values window.

Click OK to close the second Criteria.

To check the SQL statement click on Show Query Language button.

select *  from  SMS_R_System inner join SMS_G_System_CI_ComplianceState on SMS_G_System_CI_ComplianceState.ResourceId = SMS_R_System.ResourceId where SMS_G_System_CI_ComplianceState.ComplianceStateName = "Non-Compliant" and SMS_G_System_CI_ComplianceState.LocalizedDisplayName = "FCS Installed Baseline"

Click OK to close the Query and click Next and Close to save Dynamic Computer Collection.

After Updating and refreshing this Dynamic Computer Collection on right pane you will get the computers with Non-Compliant Status or the computers which do not have FCS ForeFront installed.


Desired Configuration Management: Software Distribution to Dynamic Computer Collection based on Compliant Status - Part 3

$
0
0
This article continues from Part 2  http://tompopov.blogspot.com/2011/05/desired-configuration-management_24.html 


Next Step to finish our Software distribution Scenario for Computers which are Non-Compliant based on DCM status is to apply SCCM ForeFront Client Software Package on previously created Dynamic Computer Collection:  System: DCM Dynamic Computer Collection.


Using this SCCM configuration ForeFront Client will be installed on those computers.

When next refresh interval for DCM Configuration Baseline will check the status of those computers it will show that the status now is Compliant.


That automatically means that these computers will automatically disappeared from Dynamic Computer Collection:  System: DCM Dynamic Computer Collection and no more any SCCM Software Package will be applied.


This is a good way using Desired Configuration Management feature from SCCM to keep up-to-date installed software on domain computers .  

Run Application as a Windows Service

$
0
0
To allow an application to run as Windows Service under Windows 2008 you can use SrvAny.exe which is part of Windows 2003 Resource Kit.

1. Download Windows 2003 Resource Kit from http://www.microsoft.com/downloads/en/details.aspx?FamilyID=9d467a69-57ff-4ae7-96ee-b18c4790cffd&displaylang=en
and extract it.
2. Copy SrvAny.exe into C:\Windows\System32
3. Create a service using SC command which start srvany.exe.
ex: create MyService binPath= C:\Windows\System32\srvany.exe DisplayName= "My Service"
4. Using the previous action MyService registy key has been created in Registry.
Open Registry using regedit and in HKEY_LOCAL_MACHINE\SYSTEM\CurrentControlSet\Services\MyService create a Parameters key.
5. In Parameters create an String Value Application and enter the full path of the application.

Here is the example of making flcd4.exe to work as a service.
flcd4.exe is a daemon service from Floating License feature from 3D-Equalizer http://www.sci-d-vis.com/

Create  3D-Equalizer service using SC command:
SC create 3D-Equalizer binPath= C:\Windows\System32\srvany.exe DisplayName= "3D-Equalizer"

Go to services and change the Startup type to Automatic.

Open Registry using regedit and in HKEY_LOCAL_MACHINE\SYSTEM\CurrentControlSet\Services\3D-Equalizer create a Parameters key. Here create a String Value Application and enter the full path of the application: C:\3DEqualizer\3DE4_win32_r1b11\bin\flcd4.exe. Close the registry.

Go to services and start 3D-Equalizer.


and Voilà it works!!

Instaled version of WAIK - SCCM SP2 upgrade error

$
0
0
During the upgrade from SCCM 2007 SP1 to SCCM 2007 SP2, Installation Prerequisite Check gives the following error:


OS Deployment in Configuration Manager 2007 SP2 requires the WAIK 2.0 (version 6.1.7600).

To resolve this issue current WAIK 1.1 installation from SCCM 2007 SP1 has to be removed and WAIK 2.0 version from SCCM 2007 SP2 has to be installed.

Remove WAIK 1.1 from SCCM 2007 SP1.


Install WAIK 2.0 from SCCM 2007 SP2 install DVD source.

Checking C:\Program Files\Windows AIK\Tools\x86\ImageX.exe Details property on ConfigMgr Server shows that the right version of WAIK 2.0 has been installed.

Configuring SCCM 2007 Secondary site issue

$
0
0
After installing the secondary site on SCCM secondary server in SCCM console this site has not been shown or still is pending.
Here is the solution:
Log on your Secondary SCCM Site server, copy the file \inboxes\sitectrl.box\SiteCtrl.ct0file to a temp location, rename it to 00000000.ct2 and copy the renamed file to Primary SCCM Site Server\inboxes\hman.box\
In few seconds on SCCM Console you can see the Second SCCM Site Server.

Forcing full synchronization from SCCM Parent site

$
0
0
Forcing synchronization from SCCM Parent site to the child site can be done using the following way:

Logon to SCCM Primary site using account with full SCCM admin privileges and to run preinst command from: 

C:\Program Files (x86)\Microsoft Configuration Manager\bin\i386\0000040


using the following switch:

preinst.exe /syncchild XXX

where XXX is a child SCCM code.

in my case MT1 is my primary child SCCM Server.

Check the following log files after launching preinst command:


Despool.log, Replmgr.log, Sender.log

SCCM 2007 and Microsoft Deployment Toolkit - Video

$
0
0
SCCM 2007 and Microsoft Deployment Toolkit - Video presentation by Richard Smith a Senior Consultant with Microsoft Services, UK which includes:
  • Setup the server environment for SCCM 2007 OS deployment
  • Configure the SCCM 2007 Site Settings
  • Configure the SCCM 2007 Computer Management Settings
  • Configure the SCCM 2007 Operating System Deployment Settings
  • Setup and use MDT integration with SCCM 2007
  • Add a reference machine object to SCCM 2007
  • Create a build and capture reference image for mass deployment using SCCM 2007

The instruction at 0x769a7a1f referenced memory at 0x00000028. The memory could not be written. Click on ok to terminate the program.

$
0
0
You get this error message when you want to deploy unattended Windows XP SP3 installation using SCCM 2007 R3 to VMware machine hosted on VMWare ESX Server 3i, 3.5.0.

The instruction at 0x769a7a1f referenced memory at 0x00000028. The memory could not be written. Click on ok to terminate the program.


The reason of this issue is missing mass storage drivers for VMWare image.

To resolve this issue VMWare SCSI Cotrollers drivers should be imported into SCCM and applied  to boot images and Drivers package distribution package.
Drivers for VMWare ESX machine you can find on already existed VMWare Windows XP machine in C:\Program Files\VMware\VMware Tools\Drivers\, copy to the SCCM Server and import it. To successfully install Windows XP SP3

First create a Driver Package in SCCM;


After that import the VMWare drivers into the Driver section:
Make sure that during Driver creation wizard, to update boot images and distribution points of Driver package.

..
 Add Apply Driver Package into the Task Sequence, choose previosly created VMWare driver package and check: "Select the mass storage driver within the package that needs to be installed before setup on Pre-Vista operating systems"


Failed to successfully complete HTTP request. (StatusCode at WinHttpQueryHeaders: 404)

$
0
0
When you try to install SCCM Client in ccmsetup.log file on local machine you are getting the following error:

Failed to successfully complete HTTP request. (StatusCode at WinHttpQueryHeaders: 404)
A Fallback Status Point has not been specified.  Message with STATEID='308' will not be sent.


To resolve the issue WebDav on SCCM's IIS WebDav should be configured.
Here is the way how to configure Web DAV settings:
Change the settings as is shown on the picture, Click Apply and after click on WebDAV Authoring Rule.


Configure Authoring Rule as is shown on the picture and click OK.

If you have still the same issue then remove Management Point and install it again.

Remove SCCM Child Primary Site

$
0
0
MTS - Primary Central Site
SEC - Secondary Site
MT1 - Child Primary Site

Pictures below show on SCCM Child Primary console that Computer Collections and Native SCCM Central Site Software Deployment Packages and Advertisements are locked out.


Here is the  procedure how to remove MT1 SCCM Child Primary Site from its MTS SCCM Parent Site.
First step is to delete MT1 child site address from MTS Parent Site via SCCM console.


Next step is to execute Preinst.exe which is located in C:\Program Files (x86)\Microsoft Configuration Manager\bin\i386\00000409 folder:


Executing Preinst /dump shows SCCM sites in SCCM Parent Central Site. The target is to remove MT1 Child Primary Site.

Delete jobs for MT1 site: Preinst /deljob MT1

Delete MT1 site: Preinst /delSITE MT1 MTS

Execute again Preinst /deljob MT1 to delete any job in meantime

Executing again Preinst /dump comand shows that MT1 Child Primary Site has been removed from SCCM Parent site.

On SCCM Child Primary Server Console remove settings from Report to parent site to Central site

Finaly you can see that all locked out items have been removed. All Software deployments packages, Advertisments, OS deployment packages, and Task Sequences have been inherited form SCCM Parent site into SCCM Child Site and can be modified.

Failed to resolve 'SMS_SLP' to IP address from WINS. LSGetAssignedSiteFromSLP : Unable to get the list of SLPs

$
0
0
When you try to assign SCCM Site Code using Discovery button on SCCM Client there are errors in LocationService.log


Failed to resolve 'SMS_SLP' to IP address from WINS.
LSGetAssignedSiteFromSLP : Unable to get the list of SLPs

In order to resolve these errors on domain controller WINS Server should be installed and WINS SLP parameters configured.
Here is the procedure for manually configuring WINS SLP parameters:
On DC where WINS Server already was configured in CMD run netsh.

Type wins and press Enter.
Connect to the WINS server using: server \\ip address where ip address is ip adress of WINS server.
Type add name Name=SMS_SLP endchar=1A rectype=0 ip={server locator point IP address}
where server locator point IP addressis SCCM server's IP address.
To verify that you entered correct data for SLP in your WINS Server type this command:
show name Name=SMS_SLP endchar=1A

Next step is to configure WINS server in your network card TCP/IP properties or if there is DHCP in the network to configure WINS parameter in DHCP server.

Now if you try to add Internet SCCM based client to SCCM site code specifying DNS Sufix and click Discover in few seconds SMS Site Code will be discovered successfully. Same scenario is for workgroup computers belonging to different AD forest and managing by SCCM in other forest. 

IndirectKeyMapper: RegLoadKey ...C:\Documents and Settings\...\NTUSER.DAT) failed

$
0
0
Issue: USMT 4.0 ScanState.exe is stuck in the loop and it takes time to get done. This happens on the machine where the user is not properly removed, it means just User folder is deleted from C:\Documents and Settings but its registry settings still exist.


 In the Scan.log files different warnings show that the process is stuck on user3 which does not exist in C:\Documents and Settings.

To resolve this issue this command should be executed before to start ScanState command:


SET MIG_IGNORE_PROFILE_MISSING=1


Viewing all 60 articles
Browse latest View live